30 Mayıs 2012 Çarşamba
Change your xsplash Boot Screen with your desktop change in ubuntu 9.10 Karmic Koala
Ubuntu has gained new splash screen software called xsplash, and is introduced in ubuntu 9.10 karmic Koala. Here a simple nice script for changing your xsplash screen with respect to your desktop wallpaper. Every time you change the desktop wallpaper, it will automaticaly change the xsplash screen.
Download this Script from here
1. Download and extract the file wallpaper_daemon.py
(use command tar -xzvf 114984-wallpaper_daemon_1.2.tar.gz)
2. Copy ‘wallpaper_daemon.py’ file to a safe place, it won’t get deleted.
3. Now change the file permission of ‘wallpaper_daemon.py’.
[ use command chmod +x wallpaper_daemon.py]
4. Now Install it. Run ./wallpaper_daemon.py --install5. Add wallpaper_daemon.py to the startup programs
[System > Preferences > Startup Applications]
6. Restart
Now set up your desktop wallpaper, same time your xsplash screen will also change
How to make a terminal remember sudo passowrd for ever
This password will be remembered by that terminal for 15 minutes by default.
If you want that terminal to remember your password for ever during its life time follow these steps.
1. Type at terminal
sudo visudo
2. Edit as shown below
Change
Defaults env_reset
to
Defaults env_reset,timestamp_timeout=-1
Browse Internet faster in Linux with Ziproxy
Basically it squeezes images by converting them to lower quality JPEGs or JPEG 2000 and compresses (gzip) HTML and other text-like data.
It also provides other features such as: HTML/JS/CSS optimization, preemptive hostname resolution, transparent proxying and more.
Ziproxy is an option when dealing with low-bandwidth cases like:
* ISPs providing dialup services
* ISPs providing mobile internet services
* HTTP WAN optimization cases
* Low bandwidth (or saturated) point-to-point connections in general
Ziproxy may be called a "web accelerator", although it is not the best name, considering the number of snake oil products advertised as such.
Ziproxy operates in daemon mode. It also may be invoked by (x)inetd if desired (not recommended for performance reasons).
It is HTTP/1.1-aware and compatible with HTTPS.
Currently it is known to be usable under the following OSes: Linux (Red Hat, Conectiva, Debian), FreeBSD and Cygwin (there were reports on Mac OS X and Solaris compatibility aswell).
It ran successfully under the following architectures: x86, x86-64 and SPARC32.
Ubuntu Linux users can install it from the repositories
sudo apt-get install ziproxy
HOWTO setup Squid Proxy & DansGuardian Internet Content Filter
Installing Apache$ sudo aptitude install apache2Setting a Static IP Address
Now make sure that you have a static IP address$ sudo vi /etc/network/interfacesAnd change the following (bold) to match your network# This file describes the network interfaces available on your systemPress Esc then :wq to save and exit. After saving the file, you must now restart the networking process
# and how to activate them. For more information, see interfaces(5).
# The loopback network interface
auto lo
iface lo inet loopback
# The primary network interface
auto eth0
iface eth0 inet static
address 192.168.1.2
netmask 255.255.255.0
gateway 192.168.1.1$ sudo /etc/init.d/networking restart
Installing and Configuring Squid
Install the Squid Proxy Server$ sudo aptitude install squidIf you want to change the default port that squid listens on [3128], change the http_port tag using vi, making a backup copy first$ sudo cp /etc/squid/squid.conf /etc/squid/squid.conf_backupOK, now we'll setup who is allowed access to the proxy. Find the http_access section (should start around line 1860) Uncomment these 2 lines and add your network allocations
$ sudo vi /etc/squid/squid.conf
change the line
#http_port 3128
to (or just add the line)
http_port 8080acl our_networks src 192.168.1.0/24 192.168.2.0/24Note: If you get a startup error 'FATAL: Could not determine fully qualified hostname. Please set visible_hostname' you will also need to modify the visible_hostname tag
http_access allow our_networksvisible_hostname localhostSave the file and close (Esc :wq).
Installing and Configuring DansGuardian
To install DansGuardian, use the following command$ sudo aptitude install dansguardianNote: if you get an error "Couldn't find any package whose name or description matched "dansguardian""...try$ sudo gedit /etc/apt/sources.listOnce the package is installed, edit the following lines in the conf file to match, this will set DansGuardian to do basic filtering and use Squid as its proxy server.
Add this lines:
# deb http://pt.archive.ubuntu.com/ubuntu/ jaunty universe
# deb -src http://pt.archive.ubuntu.com/ jaunty universe
then
$ sudo apt-get update
$ sudo aptitude install dansguardian# UNCONFIGUREDTo configure banned/exception sites based on either phrases, ip addresses, urls, mime type, etc… you would need to edit one of the following files. All files are located in /etc/dansguardian/
filterip =
filterport = 8080
proxyip = 127.0.0.1
proxyport = 3128bannedextensionlist
bannediplist
bannedmimetypelist
bannedphraselist
bannedregexpurllist
bannedsitelist
bannedurllist
banneduserlist
exceptioniplist
exceptionphraselist
exceptionsitelist
exceptionurllist
exceptionuserlist
exceptionvirusextensionlist
exceptionvirusmimetypelist
exceptionvirussitelist
exceptionvirusurllist
Restarting Squid and DansGuardian
Whenever a file is edited, it is good practice to restart both Squid and DansGuardian services by using the following commands$ sudo /etc/init.d/dansguardian stopNow that Squid and DansGuardian are configured, test it by setting up your browser to use the proxy server with port 8080.
$ sudo /etc/init.d/squid stop
$ sudo /etc/init.d/squid start
$ sudo /etc/init.d/dansguardian start
## to see if the service is running$ ps –e | grep dansguardian
For Fedora
All of the commands are done from Terminal.
1. In Terminal log into root with the su - command and type your root password. The space - after su is necessary to get root's path.
su -2. In Terminal enter the following command to install Squid.
yum install squid -y3. Find out your DNS nameserver by entering in Terminal the following command:
cat /etc/resolv.confIn my case the screen output showed:
nameserver 192.168.1.1Another way you can find out your DNS nameserver is by entering from Terminal in Root:
ip routeand seeing the output on the second line.
Remember the nameserver value because you need to add it to the squid.conf file.
4. In your favorite text editor (I use gedit) open up /etc/squid/squid.conf. Find the line that says
http_port 3128and add 127.0.0.1: before 3128 and the word transparent after 3128 so that it looks like this:
http_port 127.0.0.1:3128 transparent5. Find the line
#cache_effective_user squidRemove the hash mark in front of it, and under that line, add:
cache_effective_group squidThe two lines should therefore look like this:
cache_effective_user squid6. At the end of the file, type
cache_effective_group squid
dns_nameserversfollowed by a space and enter the value of the namerserver of your machine. In my case the last line looks like this:
dns_nameservers 192.168.1.17. Note: In Fedora 11 Preview on June 3, 2009, I also had to add to squid.conf the line:
visible_hostname = myhostnameor Squid would not start.
8. Save the file and exit the text editor.
9. Go to http://dag.wieers.com/rpm/packages/dansguardian/ and download the latest Dansguardian that matches your CPU architecture, either the .i386.rpm or the .x86_64.rpm.
10. In your favorite text editor, open /etc/dansguardian/dansguardian.conf
11. Search for the word filterip and edit that line adding 127.0.0.1 after filterip = so it looks like this:
filterip = 127.0.0.112. Search for the words daemonuser and daemongroup. Remove the hash marks before them, and change the word 'nobody' between the single quote marks to the word 'squid'. It should look like this:
daemonuser = 'squid'13. Save the file and exit the editor program.
daemongroup = 'squid'
14. Setup Iptables with the following commands:
iptables -t nat -A OUTPUT -p tcp --dport 80 -m owner --uid-owner squid -j ACCEPT15. Change ownership of two directories with the following commands:
iptables -t nat -A OUTPUT -p tcp --dport 3128 -m owner --uid-owner squid -j ACCEPT
iptables -t nat -A OUTPUT -p tcp --dport 80 -j REDIRECT --to-ports 8080
iptables -t nat -A OUTPUT -p tcp --dport 3128 -j REDIRECT --to-ports 8080
iptables-save > /etc/sysconfig/iptables
service iptables restart
chown -R squid /var/log/dansguardian16. Enter the following commands:
chgrp -R squid /var/log/dansguardian
chown -R squid /var/spool/squid
chkconfig httpd on17. If you use Gnome, enter in Terminal:
chkconfig squid on
chkconfig dansguardian on
service squid start
service dansguardian start
gnome-network-preferencesIn the Network Proxy Preferences click on Manual proxy configration to put a dot in the circle. Enter the value of 127.0.0.1 in the HTTP proxy section. The Port should already have the value of 8080. You need to do this in order for your browser, Yum, PackageManager, Gnome Weather, Google earth and any other application that uses the HTTP port to be able to connect to the Internet after doing all of the above. I'm sure KDE has some similar system proxy configuration GUI.
If you get an error message that either Squid or Dansguardian could not start, the most likely reason is ownership was not set correctly as mentioned in point 6. I had to manually change ownership to Squid for it to work. The ownership was previously a number: 501.Note that unless both Squid and Dansguardian are running after you make changes to Iptables and restart it, you won't be able to access any Internet content at all! After Internet traffic is set with Iptables to go through Squid and Dansguardian, both must be running properly or you won't have any Internet access whatsoever until you either fix the problem or reset Iptables as it was by default.Dansguardian would not permit me to download even compressed files after it was up and running. I had to edit the configuration files in /etc/dansguardian/ in order to permit Dansguardian to allow the download of certain files. Specifically I put hash (#) marks in front of certain lines in /etc/dansguardian/bannedextensionlist and /etc/dansguardian/bannedmimetypelist. Of course these files can only be edited with root access and so unless one knows the root password, I do not see how anyone can undermine Dansguardian's effectiveness.For more and original post for fedora see http://linux.jamesjpn.com/how-to/dansguardian-install.html
How To create RPM from Source
1. save the source file(usually in tar.gz or tar.bz2 format)
2. extract the files-> tar -xvzf filename.tar.gz or tar -xvjf filename.tar.bz2
3. open the folder of the extracted file and find .spec file
4. type-> rpmbuild -bb filename.spec
5. see the error and continue according to the error until you finish creating rpm files
6. type-> rpm -Uvh filename.rpm to install
26 Mayıs 2012 Cumartesi
How to get duration of an audio file in c# ?
private string GetDuration(string FileFullPath)
{
string duration = "";
string fName = FileFullPath.Substring(FileFullPath.LastIndexOf("\\") + 1);
string filePath = FileFullPath.Substring(0, FileFullPath.LastIndexOf("\\"));
Shell32.Shell shell = new Shell32.ShellClass();
Shell32.Folder folder = shell.NameSpace(filePath);
Shell32.FolderItem folderItem = folder.ParseName(fName);
if (folderItem != null)
{
duration = folder.GetDetailsOf(folderItem, 21);
}
folderItem = null;
folder = null;
shell = null;
return duration;
}
Hence we can get the duration of given file.
…S.VinothkumaR.
How to create Vista Gadget
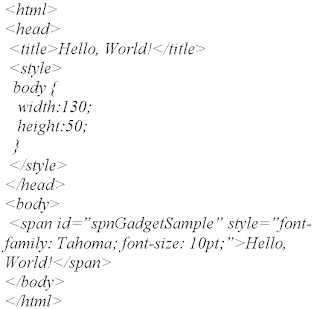
Step 1:
Create the following html file with the name of “HelloWorld.html”.
Step 2:
Create the following xml file with the name of “Gadget.xml”.
Step 3:
Create a folder called Helloworld.Gadget
Step 4:
1.Simply copy”%userprofile%\AppData\Local\Microsoft\Windows Sidebar\Gadgets” and paste in Windows explorer address bar.
2. When you get to that folder Copy and Paste the “HelloWorld.Gadget” folder there.
Step 5:
Add the gadget to your Sidebar and your done !
For more visit here …
...S.VinothkumaR.
XBAP - Windows Presentation Foundation XAML Browser Applications
XBAP – XAML Browser Application is a new windows technology used for creating Rich Internet Applications. It is used for creating heavyweight .Net applications.
XAML Browser Applications combines features of both Web applications and rich-client applications. While windows applications are normally compiled to an .exe file, browser applications are compiled to an extension .xbap and can be run inside Internet Explorer.
Like Web applications, XBAPs can be published to a Web server and launched from Internet Explorer. Like rich-client applications, XBAPs can take advantage of the capabilities of WPF. Developing XBAPs is also similar to rich-client development.
Implementing a XAML Browser Application (XBAP)
The simplest way to create a new XBAP project is with Microsoft Visual Studio:
1. On the File menu, point to New, and then click Project.
2. In the New Project dialog box, in the Project types pane, choose either Visual Basic or Visual
C#. In the Templates pane, click WPF Browser Application.
3. Assign a project name and click OK to create the new project.
The WPF Browser Application project template creates an XBAP application project that includes the following:
• An application definition, Application.xaml.
• A page, Page1.xaml.
You can add to those as required.
If you prefer developing with tools that require command-line compilation.
When you run an XBAP, it is launched in a browser window instead of a standalone window. When you debug an XBAP from Visual Studio, the application runs with Internet zone permission and will consequently throw security exceptions if those permissions are exceeded.
Deploying a XAML Browser Application
When you build a XBAP, the Microsoft build engine (MSBuild) produces the following three files as a minimum:
• An executable file. This contains the compiled code and has an .exe extension.
• An application manifest. This contains metadata associated with the application and has a
.manifest extension.
• A deployment manifest. This file contains the information that ClickOnce uses to deploy the
application and has an .xbap extension.
You publish XBAPs to a Web server (Microsoft Internet Information Services (IIS) or later). You do not need to install .NET Framework on the Web server, but you do need to register the WPF Multipurpose Internet Mail Extensions (MIME) types and file extensions.
To prepare your XBAP for deployment, copy the .exe and the associated manifests to your Web server. Create a hyperlink on a Web page to navigate to the deployment manifest. When the user clicks the link and navigates to the .xbap file, ClickOnce automatically handles the mechanics of downloading and launching the application.
Reference:
1. http://msdn.microsoft.com/en-us/library/aa970060.aspx
2. http://aspalliance.com/1824_Introduction_to_XAML_Browser_Applications_XBAP.1
...S.VinothkumaR.
Differences between XBAP, WPF Standalone and Silverlight
WPF applications are divided into two categories.
• Standalone WPF Application
• XAML browser applications (XBAPs)
There is always a confusion between WPF, XBAP and Silverlight. Developers get confused which one to go for while designing a project. Here I will explain all the 3 technologies with the differences
Standalone WPF Application
- WPF applications are installed on end user's machine.
- Appear in Start Menu and Add/Remove Programs.
- Applications can be installed via MSI or ClickOnce.
- User can be offline and use the application. There is no need for Internet connection.
- Newer versions of the application may not be automatically installed in user's machine.
- WPF standalone applications can use WCF for communication.
- Applications run in its own window as other windows applications.
XAML Browser Application(XBAP)
- These type of applications are not installed in user's machine.
- They do not appear in the in Start Menu or Add/Remove Programs.
- Applications can be automatically deployed via ClickOnce.
- Applications are hosted in the browser process.
- Can be run only in IE and Firefox.
- Newer versions are always installed automatically into the user's machine.
- User must be online to use the application.
- XBAP is Windows only. We can run the application in Windows operating system only.
- XBAPs cannot use WCF.
- The user machine should have .NET framework 3.0 components.
Silverlight
- XBAP is IE and Firefox only. But Silverlight can run in any browser and platform.
- Silverlight is used for creating rich UI web application.
- User's machine don't need .NET framework.
- Can be embedded in HTML markup and rendered in any browser using the silverlight plug in.
- XABP has 99% features of WPF. But Silverlight is just a subset of WPF.
...S.VinothkumaR.
Silverlight - Introduction
Silverlight provides a retained mode graphics system similar to Windows Presentation Foundation, and integrates multimedia, graphics, animations and interactivity into a single runtime environment. In Silverlight applications, user interfaces are declared in XAML and programmed using a subset of the .NET Framework. XAML can be used for marking up the vector graphics and animations. Textual content created with Silverlight is searchable and indexable by search engines as it is not compiled, but represented as text (XAML).
Releases
1. Silverlight 1.0
2. Silverlight 2
3. Silverlight 3
Tools for Silverlight application
To developing Silverlight application, Microsoft has been released some set of tools. They are,
• Visual Studio 2008 with Service Pack 1
• Silverlight 2 Beta 2 SDK
• Expression Blend 2 July 2008 Preview
All of us known about Visual Studio. Expression Blend is Microsoft's user interface design tool for creating graphical interfaces for web and desktop applications. Blend is writing using the .NET Framework 3.0 and Windows Presentation Foundation (WPF). Microsoft Expression Blend does the same of Adobe Photoshop to edit your images as well as add effects to existing images.
How to create Silverlight applications?
There is a question in our mind raising that “How to create Silverlight applications?” Here is the answer for your question,
1. Use Visual Studio 2008 SP1 to create a new Silverlight project based on the Silverlight 2 Beta 2 Template. Visual Studio will do the necessary steps to add a single HTML page or a single website to host your Silverlight application. This is because Silverlight is a plug-in that renders in the browser.
2. Add your necessary XAML files needed for the user interface. This is similar to the forms that you would add to a Windows Form application.
3. Edit the XAML page using Expression Blend 2 July 2008 preview. Note that Because each page in Silverlight 2 Beta 2 is treated as a user control, only Expression Blend 2 July 2008 preview will be capable of opening these particular XAML files. Any older version of Expression Blend will throw an error message saying that it is unable to open that file type.
4. Switch to Visual Studio 2008 SP1 to write code behind files for the controls and pages that you created in Step 2.
5. Build and compile the application.
6. Host the same in IIS or any web server of your choice. For this demonstration, you will rely on Windows Vista for development and IIS for hosting the application.
...S.VinothkumaR.
23 Mayıs 2012 Çarşamba
60% OFF Aiseesoft iPad 2 ePub Transfer Coupon Code
Aiseesoft iPad 2 ePub Transfer discount coupons:
Coupon code (Click to use): SOFT-7K9O-AISE (60% Off Aiseesoft iPad 2 ePub Transfer)
Regular price:
You save ($9)
Aiseesoft iPad 2 ePub Transfer Review:
Aiseesoft iPad 2 ePub Transfer is specially designed for iPad 2 users to transfer ePub files. This iPad 2 ePub files Transfer can help you conveniently export ePub files to iPad 2. Then you can freely enjoy the ePub files with your iPad. Moreover, this iPad 2 ePub Transfer can backup your iPad 2 ePub to your computer. You will have no worry about files missing. Also this iPad 2 ePub Transfer provides you with lots of user-friendly features.
Price: $15.00 $6
Download Aiseesoft iPad 2 ePub Transfer trial
Use Aiseesoft iPad 2 ePub Transfer Coupon Code
Save $9
60% OFF Aiseesoft iPad 2 ePub Transfer for Mac Coupon Code
Aiseesoft iPad 2 ePub Transfer for Mac discount coupons:
Coupon code (Click to use): SOFT-7K9O-AISE (60% Off Aiseesoft iPad 2 ePub Transfer for Mac)
Regular price:
You save ($9)
Aiseesoft iPad 2 ePub Transfer for Mac Review:
Aiseesoft iPad 2 ePub Transfer for Mac is the most professional ePub files transferring tool to help you transfer ePub files between iPad 2 and Mac. With this software, you can conveniently transfer local ePub files to your iPad 2. Then you can enjoy the ePub file with iPad 2. This iPad 2 ePub Transfer can guarantee you the perfect transferring effect. With iPad 2 ePub Transfer for Mac, you can backup your iPad 2 ePub files to Mac. Then you can freely share the e-book with your friends.
Price: $15.00 $6
Use Aiseesoft iPad 2 ePub Transfer for Mac Coupon Code
Save $9
60% OFF Aiseesoft iPad 2 to Computer Transfer Coupon Code
Aiseesoft iPad 2 to Computer Transfer discount coupons:
Coupon code (Click to use): SOFT-7K9O-AISE (60% Off Aiseesoft iPad 2 to Computer Transfer)
Regular price:
You save ($11.40)
Aiseesoft iPad 2 to Computer Transfer Review:
Aiseesoft iPad 2 to Computer Transfer can conveniently help users transfer iPad 2 files, such as movies, music (including music video), and photos to your local disc. Besides of iPad 2, this software also supports all iPod, iPhone and iPad versions. And this iPad 2 to Computer Transfer can work perfect with the latest iOS 4.2.Price:
Download Aiseesoft iPad 2 to Computer Transfer trial
Use Aiseesoft iPad 2 to Computer Transfer Coupon Code
Save $11.40
60% OFF Aiseesoft iPad 2 to Computer Transfer Ultimate Coupon Code
Aiseesoft iPad 2 to Computer Transfer Ultimate discount coupons:
Coupon code (Click to use): SOFT-7K9O-AISE (60% Off Aiseesoft iPad 2 to Computer Transfer Ultimate)
Regular price:
You save ($17.40)
Aiseesoft iPad 2 to Computer Transfer Ultimate Review:
Aiseesoft iPad 2 to Computer Transfer is the best transferring tool for iPad 2 users. It can conveniently help users transfer iPad 2 files, such as music, movies, TV shows, podcast, iTunes U, ePub, PDF, audio books, camera roll, picture, voice memos, camera shot, etc., to your local disc. Besides of iPad 2, this software also supports all iPod, iPhone and iPad versions. It can assist users to backup iPhone ringtone, SMS, contacts and call list to computer. And this iPad 2 to Computer Transfer can work perfect with the latest iOS 4.2.
Price: $29.00 $11.60
Download Aiseesoft iPad 2 to Computer Transfer Ultimate trial
Use Aiseesoft iPad 2 to Computer Transfer Ultimate Coupon Code
Save $17.40
60% OFF Aiseesoft iPad 2 to Mac Transfer Coupon Code
Aiseesoft iPad 2 to Mac Transfer discount coupons:
Coupon code (Click to use): SOFT-7K9O-AISE (60% Off Aiseesoft iPad 2 to Mac Transfer)
Regular price:
You save ($11.40)
Aiseesoft iPad 2 to Mac Transfer Review:
Aiseesoft iPad 2 to Mac Transfer is the best assistant tool to iPad 2 users to transfer files to iPad 2 on Mac. This transferring software is able to transfer music, movies, TV shows, podcast, iTunes U, ringtone, ePub, PDF, audio books, camera roll, picture, voice memos, camera shot, etc. from iPad 2 to Mac. Beside of iPad 2, this iPad 2 to Mac Transfer support other iPod, iPhone and iPad versions. And the intuitive of this software can bring you much convenience while transferring files. And we can guarantee you the files after transferring will keep the original quality.
Price: $19.00 $7.60
Use Aiseesoft iPad 2 to Mac Transfer Coupon Code
Save $11.40
17 Mayıs 2012 Perşembe
How do I disable the ping response?
It is a small network packet sent to the machine. If the machine is up, an answer will be sent. The time needed to get the answer is called ping time or round-trip time.
The ping response from an IP indicates the machine is up.
Unfortunately this can be used to quickly scan an IP-range for reachable hosts.
This can be used to find potential hackable machines. If your machine doesn't answer to pings, your chance to be seen is reduced. (That doesn't mean your machine is more secure, the machine is just not that easy to be seen from the internet. Nothing more.)
Add the following line to your init script for the network (the name depends on the distribution you use):
echo 1 >/proc/sys/net/ipv4/icmp_echo_ignore_all
This disables ping responses.
To reenable, use the following command:
echo 0 >/proc/sys/net/ipv4/icmp_echo_ignore_all
To make this permanent set the following into /etc/sysctl.conf (if you have such a file)
net.ipv4.conf.icmp_echo_ignore_all = 1
How to Install Nvidia Video Drivers In 10.04 Lucid Lynx
$ sudo apt-get purge nvidia*
2. Next we need to blacklist “nouveau”. Do so by adding the following into /etc/modprobe.d/blacklist.conf with your favorite text editor.
$ sudo blacklist nouvea
3. Install the latest official stable driver from the repository
$ sudo apt-get install nvidia-current
4. Next we’ll load the Nvidia kernel module
$ sudo modprobe nvidia
5. Verify it’s successful entry via lsmod like so
$ sudo lsmod | grep -i nvidia
6. And one last step, we must create the Nvidia configuration file.
$ sudo nvidia-xconfig
Expected features in Fedora 13 Goddard
boot.fedoraproject.org (BFO) is one of the unique features in Fedora. This effort by Fedora community hopes to completely remove DVD installations in long term. It allows users to download a single, tiny image and install current and future versions of Fedora without having to download additional images.
This method is similar to Pxeboot, can also be considered as a Fedora branded version ofboot.kernel.org.
System Rollback feature with Btrfs
Btrfs lets you take light weight snapshots of the filesystem which can be mounted or booted into selectively. This means, before doing something crazy with your system, you can easily take a snapshot of the partition and in case something bad happens, just boot into the older snapshot.
Design Suite Spin, to make Fedora look even better
This suite will contain all the required applications targeted at designers. Here is a list of the applicationsthat are going to be included.
The Fedora Design Suite includes well-selected applications, fitting a variety of use cases. Whether you decide to work on publishing documents, creating images and pictures or even 3D content, the Design Suite has a fitting tool.
Network Manager finally has a Command Line
I have always been a command line fan but when it comes to managing multiple network connections(including wireless), I always ended up using Network Manager, wondering if they will ever add a command line support
Zarafa, a complete Open Source groupware suite is now available in Goddard
Zarafa is an open source groupware suite that can be used as a drop-in Exchange replacement for Web-based mail, calendaring, collaboration and tasks. Features include IMAP/POP and iCal/CalDAV capabilities, native mobile phone support, the ability to integrate with existing Linux mail servers, a full set of programming interfaces, and a comfortable look and feel using modern Ajax technologies.
KVM Stable PCI Address
The allow devices in KVM guest virtual machines to retain the same PCI address allocations as other devices are added or removed from the guest configuration. It allows the devices to be added or removed from the guest configuration. The feature would remove a significant issue with Fedora's virtualization support for Windows.
3D Support for Nvidia Systems
In addition to the experimental 3D support for certain ATI chipsets introduced in Fedora 12 the mesa-dri-drivers-experimental package now includes 3D support for Nvidia systems via the free and open source Nouveau driver and your early testing and feedback is appreciated.
Improved Software management
Performance of RPM has improved considerably with the integration of RPM 4.8 Beta 1 which is included in this release. A number of other enhancements included ordered erasures, smarter dependency loop handling, revamped Python bindings including compatibility with Python 3.x and a large number of bug fixes.
Enhanced Init System
Upstart has been updated to 0.6 which provides a incremental step towards moving to native Upstart scripts in a subsequent release of Fedora.
Installer Changes
The Anaconda installation program’s user interface has been upgraded, with a simpler workflow for desktop and laptop users, enhanced options for advanced storage usage, and more understandable dialogs. Of course it still retains the powerful kickstart capability for automating the installation process.
The default size of partitions has been readapted to modern hardware. The /boot partition now defaults to a size of 500 MB during a fresh installation, to aid in later use of PreUpgrade and the dracut utility.
On systems with more than 50 GB of free space, the /home partition is now created separately during a fresh installation. A separate /home partition makes it easier to perform some backup, upgrade, encryption, and re-installation procedures.
Firefox 3.6 Web Browser
Firefox 3.6.1 is included in this release. In Firefox 3.6 Personas are built in. HTML 5 video can now be displayed in full screen, support for the WOFF dont format is added, and better Javascript support which includes better speed and improved overall browser responsiveness.
Better Webcam Support
Fedora 13 now includes out of the box webcam support for a lot of so called dual-mode cameras. These are cheap still cameras (which usually hold only on board storage, no memory card slot), which can can also function as a webcam

Downgrading GRUB [ Ubuntu 10.04 ]
Make backup copies of the main GRUB 2 folders & files. (Optional)
sudo cp /etc/default/grub /etc/default/grub.old
sudo cp -R /etc/grub.d /etc/grub.d.old
sudo cp -R /boot/grub /boot/grub.old
Remove GRUB 2
sudo apt-get purge grub2 grub-pc
The system will be unbootable until another bootloader is installed.
Once the packages are removed, many files will still remain in ‘/boot/grub’
Install GRUB 0.97
sudo apt-get install grub
With grub installed, the user must still create the menu.lst and stage1/stage2 files by running the following two commands.
sudo update-grub
Generates menu.lst ; Tab to “Yes” when prompted.
sudo grub-install /dev/sdX
Choose the correct device (sda, sdb, etc), normally the one on which Ubuntu is installed.
Creates the stage1 & stage2 files in /boot/grub and writes to the MBR.
Run this command to keep it from upgrading automatically:
echo "grub hold" | sudo dpkg --set-selections
Reboot
ref: http://ubuntuforums.org/showthread.php?t=1298932
How to fix intel video card freezing problem in Ubuntu 10.04
This issue was known by ubuntu team and they provided a few solutions for it, but the instructions are not quite easy to understand for new Linux users.
In order to apply any of those changes, you need to boot your computer using a Linux live CD, preferably not that of Ubuntu 10.04. Once your computer is booted, you need to find out which partition holds your system files by issuing the following command:
sudo fdisk -l
After locating the partition that keeps your linux file systems, you need to mound it somewhere. In my case /dev/sda1 was the name of partition which held all the system files. So I ran the following command to mount that partition to /mnt directory:
sudo mount /dev/sda1 /mnt
Now you need to change your root directory using the following command:
chroot /mnt
You should be all set to follow the instruction on ubuntu's website now
13 Mayıs 2012 Pazar
convert wav to Mp3.
Try converting the .wav files into MP3 file with iTunes. If you don’t know how, just follow us!!!!!
- download iTunes.
- Select one of the three preferences from the drop down list next to setting to specify a quality preference. Your options are:
- Good Quality
- High Quality
- Higher Quality
- For web usage, you may need more compression. In Setting, choose Custom and then choose between 24 kpbs and 128 kbps according to the quality you want. 64 kpbs and 128 kbps are often used by web designers. (Tip: Always use the Stereo mode for music). Click OK to close that window.
- Click OK again to close the Preferences window.
- Select one or more .wav files from your music library.
- Open the Advanced tab on top of your screen , choose Create MP3 Version.
How to disable the Win Form’s Close Button ?
Disable the Win Form’s Close Button using C#
Here is the simple way to disable the Form’s close button. Just copy the following code in your code behind. Then run the form, surely the close button would be disabled.private const int CP_NOCLOSE_BUTTON = 0x200;
protected override CreateParams CreateParams
{
get
{
CreateParams myCp = base.CreateParams;
myCp.ClassStyle = myCp.ClassStyle | CP_NOCLOSE_BUTTON;
return myCp;
}
}
That's it...
S.VinothkumaR.
What is OfType operator in LINQ?
OfType operator is used to return objects of a certain type. For example if we have an array of objects which contains strings, decimal, float and numbers or any other. We can use OfType operator to extract only strings or any particular type of values.
Here is an example to fetch the string values from an array of objects. See below,
private void Form1_Load(object sender, EventArgs e)
{
object[] values = {"test1",45,'c',"test2",34.67,12/12/2009,"test3",4.0,4.4f};
var strings = values.OfType
int top = 10;
foreach (var s in strings)
{
Label lbl = new Label();
lbl.Top = top;
top = top + 30;
lbl.Text = s;
this.Controls.Add(lbl);
}
}
You just copy the above code in to Form_Load and run the solution. There will be shown the string values.
...S.VinothkumaR.
How to change the header backcolor in datagridview C#
Set the following properties for your DataGridView control by using the properties window.
EnableHeadersVisualStyles = False
RowHeadersBorderStyle = Raised
Then copy the following code in your Form_Load event.
DataGridViewCellStyle style = this.dataGridView1.ColumnHeadersDefaultCellStyle;
style.BackColor = Color.WhiteSmoke;
style.ForeColor = Color.Gray;
style.Font = new System.Drawing.Font("Arial", 10F, System.Drawing.FontStyle.Bold, System.Drawing.GraphicsUnit.Point, ((byte)(0)));
Now run your application, the header style would be changed and showing a new style that we wants.
...S.VinothkumaR.
How do we change the header BackColor and selected color in ListView using c#?
Yes, we can make it possible to change the header backcolor and style for ListView control. And also we can change the some styles in ListView control in the code behind. Here is the way to explain how it is possible.
There is property named “OwnerDraw” is used to do the style changing process by our code behind. Just we need to set that property as “true”.
I have a ListView control with the name of “lstView” in my sample form, and the code has been written as follows,
this.lstView.BackColor = System.Drawing.SystemColors.ControlText;
this.lstView.BorderStyle = System.Windows.Forms.BorderStyle.None;
this.lstView.Columns.AddRange(new System.Windows.Forms.ColumnHeader[] {
this.columnHeader1,
this.columnHeader2,
this.columnHeader3});
this.lstView.ForeColor = System.Drawing.SystemColors.ControlLightLight;
this.lstView.FullRowSelect = true;
this.lstView.HeaderStyle = System.Windows.Forms.ColumnHeaderStyle.Nonclickable;
this.lstView.Location = new System.Drawing.Point(2, 1);
this.lstView.MultiSelect = false;
this.lstView.Name = "lstView";
this.lstView.OwnerDraw = true;
this.lstView.View = System.Windows.Forms.View.Details;
private void lstView_DrawColumnHeader(object sender, DrawListViewColumnHeaderEventArgs e)
{
System.Drawing.Drawing2D.LinearGradientBrush GradientBrush = new System.Drawing.Drawing2D.LinearGradientBrush(e.Bounds, Color.Blue, Color.LightBlue, 270);
e.Graphics.FillRectangle(GradientBrush, e.Bounds);
e.Graphics.DrawRectangle(new Pen(new SolidBrush(Color.White), 2), e.Bounds.X + 1, e.Bounds.Y + 1, e.Bounds.Width - 2, e.Bounds.Height - 2);
e.Graphics.DrawString(e.Header.Text, new Font("Arial", 12), new SolidBrush(Color.Yellow), e.Bounds);
}
private void lstView_DrawItem(object sender, DrawListViewItemEventArgs e)
{
if (e.Item.Selected)
{
e.Graphics.FillRectangle(new SolidBrush(Color.DarkBlue), e.Bounds);
}
e.Graphics.DrawString(e.Item.Text, new Font("Arial", 10), new SolidBrush(Color.White), e.Bounds);
}
private void lstView_DrawSubItem(object sender, DrawListViewSubItemEventArgs e)
{
e.Graphics.DrawString(e.Item.Text, new Font("Arial", 10), new SolidBrush(Color.White), e.Bounds);
}
That's it...
...S.VinothkumaR.
Simple Collapse Panel - Windows application in C#
I have created a panel control with up/down arrow images. We can collapse this control by clicking those arrows. There are some property values allowing us the interval of collapsing time. The ScrollInterval value is used to set the interval time for collapsing animation. And the HeaderHeight property value is set to be the height of header part in this control. I just used some calculation to set the height value for this control in a certain loop. This much of calculation makes some animation to collapsing the control.
You can see the magic of this control by downloading the demo project which is available to download here.
The simple calculation of control’s height is possible to collapse the control. Just see the following code,
if (this.Height > this.lblTop.Height)
{
while (this.Height > this.lblTop.Height)
{
Application.DoEvents();
this.Height -= ScrollIntervalValue;
}
this.lblTop.ImageIndex = 1;
this.Height = this.lblTop.Height;
}
else if (this.Height == this.lblTop.Height)
{
int x = this.FixedHeight;
while (this.Height <= (x))
{
Application.DoEvents();
this.Height += ScrollIntervalValue;
}
this.lblTop.ImageIndex = 0;
this.Height = x;
}
Just refer the control in your application, and add the control in your form. Then set the property values of this control ScrollInterval and HeaderHeight as you want. If you don’t set those property values it might be taken by default values. Now build your project and run. By clicking the arrow images in collapse panel, you can see the magic.
For More…see my article in code project.
http://www.codeproject.com/KB/cs/CollapsePanel.aspx
...S.VinothkumaR.
Query for importing data’s from XL to SqlServer DB
Just copy the following code and run in your sql server query window. Before that make XL sheet with the appropriate fields and values and place it in c drive or wherever you wants.
INSERT INTO [dbo].[TableName] ([FieldName1] ,[FieldName2] ,[FieldName3] ,[FieldName4] FROM OPENDATASOURCE('Microsoft.Jet.OLEDB.4.0', 'Data Source=C:\db.xls;Extended Properties=Excel 8.0')...[SheetName$]
that's it...
...S.VinothkumaR.
Simple recursive function for string folding in C#
if (lblBody.Text.Length > 150)
{
lblBody.Text = lblbodystring(lblBody.Text,150);
}
//Simple recursive function for string folding.
private string lblbodystring(string bodyString, int Length)
{
string retVal = "";
if (bodyString.Length > Length)
{
retVal = bodyString.Substring(0, Length);
retVal = retVal + Environment.NewLine;
retVal = retVal + lblbodystring(bodyString.Substring(Length));
}
else
{
retVal = retVal + Environment.NewLine;
retVal = retVal + bodyString;
}
return retVal;
}
The thing is that we can use textbox with multiline attribute for this kind of process :). But I have used in label. So...
...S.VinothkumaR.